In this Windows 10 guide, I will show you how to check if a Windows 10 64-bit version is compatible with your PC and how to upgrade from Windows 10 32-bit like a 32 bit laptop to Windows 10 64-bit version. This guide is for Windows operating systems only, it doe snot matter if Windows is installed on laptop or on a Desktop PC.
It is important that you make a full backup of your system including personal files and folders before upgrading because Windows Updater will empty the installation partition during the upgrade. At the very least, you should back up all personal files and transfer them to another media or system before you begin. Read our tutorial on how to back up your system.
The 64-bit version of Windows 10 can only be installed if your computer's hardware supports it (e.g. a 64 bit laptop). You can check this by following the four steps below. Please keep in mind that 64Bit Windows requires more RAM (Random Access Memory) that the 32bit version, you might check Windows System information (device and hardware details) to ensure that you have at least 4GB of RAM.
Making Sure 64 Bit Windows is Compatible With Your PC
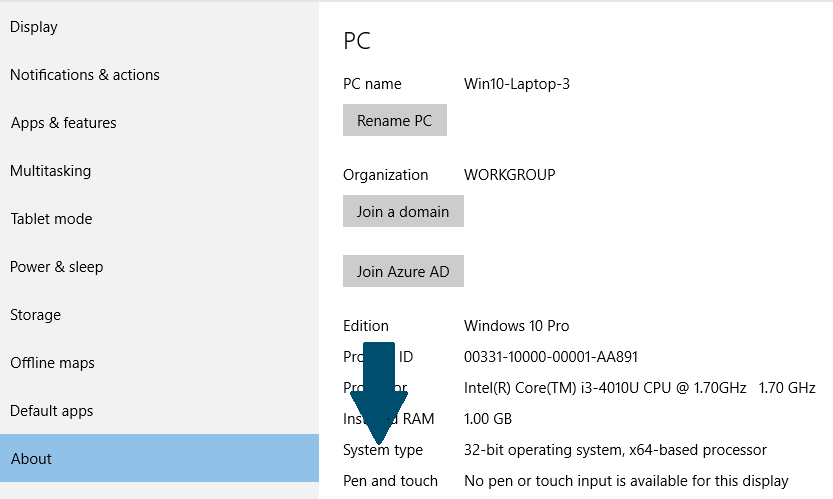
Step 1: Press Windows key + I from the keyboard.
Step 2: Click on System.
Step 3: Click on About.
Step 4: Check the system type, if it says: 32-bit operating system, x64-based processor then your PC is running a 32-bit version of Windows 10 on a 64-bit processor (32bit x64). If it says 32-bit operating system, x86-based processor, then your computer doesn't support 64bit Windows.
Creating a Windows 10 Installation Media
Step 1: Connect a USB drive to your system, the USB media must have at least 4 GB in size. The media is formatted, so don't use media which contains files.
Step 2: Visit Microsoft's Windows 10 download page.
Step 3: Download the Media Creation Tool by clicking the Download tool now button.
Step 4: Run the MediaCreationTool.exe.
Step 5: Accept the license terms.
Step 6: Choose to Create an installation media for another PC.
Step 7: Click Next.
Step 8: Uncheck Use the recommended options for this PC.
Step 9: Make sure to select 64-bit architecture (x64).
Step 10: Click Next.
Step 11: Choose the USB flash drive option.
Step 12: Click Next.
Step 13: Select the removable drive from the list.
Step 14: Click Next.
Installing 64-bit Version of Windows 10
Step 1: Restart your PC (via start button) with the USB drive connected to the system and start the installation of Windows 10.
Step 2: Click Next.
Step 3: Click Install Now.
Step 4: Skip entering the product key.
Step 5: Accept the license terms.
Step 6: Click Custom: Install Windows only (advanced).
Step 7: Select and delete system partitions -- usually: Drive 0 Partition 1 and Drive 0 Partition 2.
Step 8: Click Next and follow the instructions to install Windows 10.
After the installation is finished, download the latest updates and drivers from Windows updates.
