
Apache Maven is a build automation tool that is used in many projects today. Maven provides coders and DevOps with a standard way to create and manage projects, as well as implement software project management processes such as maintenance, release, and reporting on the progress of the project. An important part of any software developer or company is the ability to track what they have invested in - this is often done through the use of a good project management tool that provides visibility into the team's progress.
Maven defines both a standard directory structure for storing source code, configuring plug-ins to perform builds, managing dependencies required to build source code, and reporting on the overall health of the project or errors that occur during dependency resolution. All of this is defined in Maven's Project Object Model (POM). Once this metadata is created, Maven can be used to build projects through its well-defined command-line interface.
Apache Maven simplifies software compilation by making repeated build steps deterministic. This allows developers to quickly configure an environment that can perform these tasks in multiple locations without having to factor in time-consuming steps such as source code download and repeated compilation.
Maven is cross-platform and requires only a Java runtime environment (JRE) on the system. Maven runs on many different hardware/operating system configurations and integrates with most build tools such as Apache Ant, Eclipse, Microsoft Visual Studio, and NetBeans.
This article shows the steps to install Apache Maven on Debian 10 and Debian 11
Prerequisites
In order to start installing Apache Maven on Debian, you will need to have the following:
- Debian 11 or Debian 10 is installed on your local system running as a user with sudo privileges.
- A connection to the Internet.
Updating the System
Before installing anything, it is good practice to update the system first. This can be done by running the following command:
sudo apt-get update && sudo apt-get upgrade -y
You may be prompted for your sudo password. Then the update can begin. This may take a few minutes to complete depending on your connection speed to the Internet.
Install Java
Apache Maven required Java installed in order to be able to work properly. Java is a programming language that runs on the Java Virtual Machine (JVM), which Maven utilizes to run.
You can install Java using the following command:
sudo apt install openjdk-11-jre -y
You may be prompted for your sudo password, then the download and installation process will begin.
Once the installation process has been completed, you can confirm that Java is installed and the version using the following command.
java -version
You should see the openjdk version displayed on the terminal. If not, please go back and make sure you have fulfilled all of the prerequisites to complete this tutorial.
Sample output:

Once you have Java installed, the next step is to install Maven itself.
Install Apache Maven
Apache Maven is included in the default Debian repositories. This means that it can be installed using apt-get. This is the easiest way to install Apache Maven on Debian 10. However, this version is not always the most recent version. To install Apache Maven on Debian 10, run the following command.
sudo apt install maven -y
Once the installation process has been completed, you can use the following command to confirm that Maven has been installed on your system.
mvn -version
You will see something similar to the following output displayed on the terminal.
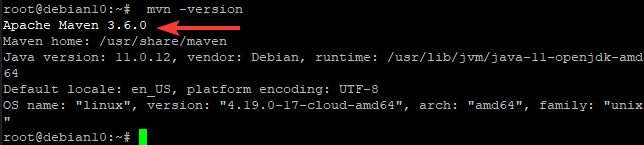
The information provided in the output confirms that Maven has been installed and it is working properly.
Testing the Maven Installation
Now that Apache Maven has been installed on Debian, you can test to make sure it works correctly. The first step is to create a testing directory to work within. This can be done by running the following command.
cd && mkdir testing-maven
Once the testing directory has been created, change into that directory using the following command.
cd testing-maven
Once you are in the testing-maven directory, create a sample Maven project using the following command.
mvn archetype:generate -DgroupId=com.mycompany.app -DartifactId=my-app -DarchetypeArtifactId=maven-archetype-quickstart -DarchetypeVersion=1.4 -Dinteractivemode=false
This command calls upon Maven to create a sample project called my-app under the group com.mycompany.app with an artifact ID of my-app within the testing directory that we just created.
The following screen will be displayed on the terminal.

Now, move into the new directory under testing-maven created by Maven during the project creation process.
cd my-app
Within this directory, you will see the files that were created by Maven during the project creation process.
ls -l
Sample output:

The pom.xml file is the file that contains the project information. It includes information such as where the source code in the project comes from, what dependencies are required in order to run this project in a Java Virtual Machine (JVM), and other settings.
Next, open up the pom.xml file in your favorite text editor. You can edit it using nano or vim if desired; however, nano will be used here for demonstration purposes only.
sudo nano pom.xml
You will see basic project information displayed on the screen like the one below.
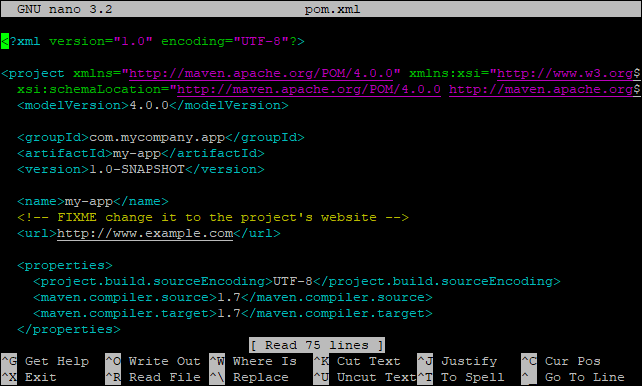
You can find more documentation online about the pom.xml file and how to use Maven as a build tool by visiting its official website.
Removing Apache Maven
If you would like to remove Apache Maven from Debian, follow these steps:
sudo apt-get purge maven -y && sudo apt autoremove --purge
The above two commands will remove all of the files related to Apache Maven from your system.
Conclusion
And that’s it! You have successfully installed Apache Maven on Debian. If you have any feedback, corrections, or clarifications, please leave them in the comments section below.