A database is a place where you store information. Cassandra is a type of database that is different from most databases because it does not use tables. Cassandra was developed by Facebook in 2008 as part of Facebook’s Open Compute Project. Cassandra is a NoSQL database that combines the speed of a key-value store with the flexibility of a schema-less document store and BigTable’s distributed system model.
NoSQL databases are different from traditional relational databases. NoSQL is short for “not only SQL”, because NoSQL databases support many languages, not just SQL. NoSQL databases are growing in popularity due to their flexibility and the lack of a need for schema validation.
Some Benefits of Cassandra
Flexible data model. It is schema-less, so you can store different types of objects in one column without changing the schema every time an object changes.
High availability and linear scalability. Cassandra databases are self-healing, which means they will recover after hardware failures without any human intervention. Cassandra also scales horizontally, which means you can add more machines to your database cluster when you need to.
This blog post will walk you through the steps to install Apache Cassandra on a Debian 10 or Debian 11 machine. The instructions are designed for people who have never installed Apache Cassandra before and want to get started. There is no better time than now!
Prerequisite
- You must have a Debian machine with at least 2GB of RAM. You will also need an active internet connection to download the required packages.
- Since this is a tutorial on installing Cassandra, it’s assumed you have some basic knowledge of Linux and know your way around the command line. It would also be helpful to have some database experience because this tutorial will not cover any database concepts or theories.
- A non-root user with sudo access is also required.
Step 1: Update and Upgrade the System
Before doing anything else, you should ensure your system is up to date and has the latest packages.
sudo apt-get update && sudo apt-get upgrade -y
During this process, you may be prompted to enter your sudo password. Type it in and press Enter.
The update command retrieves the latest information for available updates to packages on your system. These packages could be software applications, programming languages, etc.
The upgrade command takes this information and downloads all updated packages to your system.
Once the update and upgrade process is finished, we will install some required dependencies. Such as the Software Properties common package
sudo apt install apt-transport-https ca-certificates wget -y
sudo apt install dirmngr gnupg software-properties-common -y
The above command installs the required dependencies. Those dependencies are used by other packages in the next step to add additional repository sources to your system over HTTPS protocol.
Step 2: Installing Java
Cassandra requires java to run, so installing java first is necessary. There are a few other options available out there for this software, but we recommend Java 8. Cassandra also supports Java 11, but some plugins may not be compatible.
Java 8 is unavailable in the Debian repositories, so you must add the AdoptOpenJdk repository to your system and install the OpenJDK java bundle. OpenJDK is an open-source Java Platform, Standard Edition (Java SE) implementation. This package will be installed with the compilation tools and dependencies you need to compile and build applications written in Java.
First, add the public key to the APT with the following command. We use the wget command to get the public key, and then added it to the APT with the sudo apt-key add command.
wget -qO - https://adoptopenjdk.jfrog.io/adoptopenjdk/api/gpg/key/public | sudo apt-key add -
You should get an OK output, which means the key was successfully imported.
Next, add the adoptOpenJDK repository to your system.
sudo add-apt-repository --yes https://adoptopenjdk.jfrog.io/adoptopenjdk/deb/
Next, update your system so that Java can be installed.
sudo apt update -y
Finally, install Java with the following command.
sudo apt install adoptopenjdk-8-hotspot -y
Once the above command is complete, you should be able to check that Java is installed by typing:
java -version
If everything is completed successfully, you should see the following output.

Step 3: Installing Apache Cassandra
Once we have installed java, we can now install Cassandra.
First, we need to add Apache Cassandra repositories to your system. We will use the deb source package name to download the latest version of Apache Cassandra from the official site.
wget -q -O - https://www.apache.org/dist/cassandra/KEYS | sudo apt-key add -
sudo sh -c 'echo "deb https://www.apache.org/dist/cassandra/debian 311x main" > /etc/apt/sources.list.d/cassandra.list'
next, update your sources lists with these commands.
sudo apt update -y
Now, install the Apache Cassandra package by typing the following command. This will also install apache-cassandra-doc and libapache2-mod-scgipi .
sudo apt install cassandra -y
Once the command finishes without any error, you can start Cassandra by typing:
sudo service cassandra start
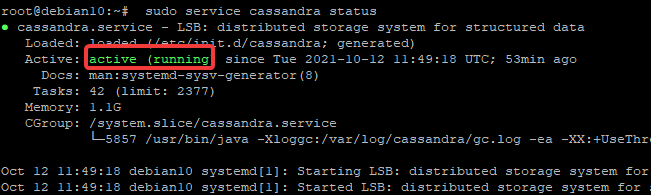
To verify that the Cassandra service is running, type:
sudo service cassandra status
You should get an output similar to the following one. This means Apache Cassandra is up and running.
Step 4: Testing Apache Cassandra
The next step is to test whether Cassandra is able to communicate with other systems.
Cassandra provides a command line tool called cqlsh for executing CQL commands interactively, and also a built-in data modeling tool called DataStax OpsCenter. To try the cqlsh tool, type:
cqlsh
Your shell should change to a cqlsh> prompt. This is where you can issue CQL commands.
For further usage, refer to the command documentation for more details on all the features provided by the cqlsh command-line tool. Type exit at the prompt and press Enter to leave the cqlsh shell.
To verify that Cassandra is communicating with other systems correctly, run the nodetool status command.
sudo nodetool status
If the output is similar to the one below, it means Cassandra is communicating with other systems correctly.
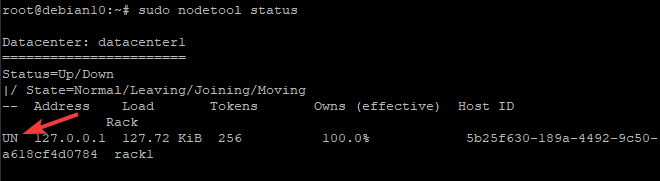
You can see the UN part of the output, which stands for"Up" and “Normal”. That means Cassandra is running properly.
Conclusion
This tutorial taught you how to install Apache Cassandra on Debian Linux. You have also learned how to verify that Cassandra is working properly. If you have any questions, please comment below. Thank you for reading this article, and we hope it was helpful to you.