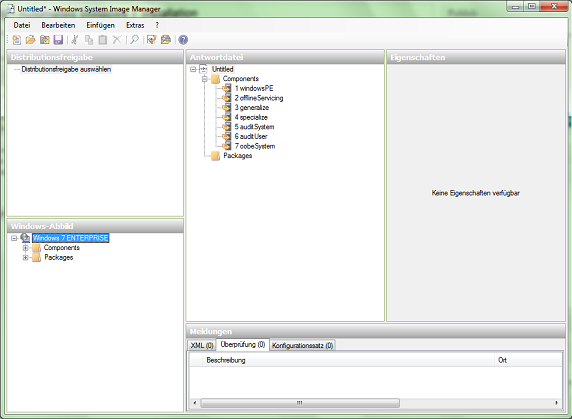
There is a possibility to create a Windows 7 installation DVD that runs fully automated without any user interaction - this is done by placing a file called autounattend.xml into the image's root directory. In this file you specify all the keywords that will be read into the fields of the installation process.
To create such a file, you best use Microsoft's Windows Automated Installation Tools. These include the System Image Manager, which provides a graphical user interface for our purposes. You can download the WAIK here: http://www.microsoft.com/downloads/de-de/details.aspx?FamilyID=696dd665-9f76-4177-a811-39c26d3b3b34
Afterwards, copy your regular installation disk's files onto a folder on your hard drive - those will later be edited to fit your likings. Type Windows System Image Manager into the Windows 7 menu search bar and open it.
In the bottom left Windows Image panel, right-click and insert the install.wim that is located in the sources subdirectory of the installation disk's root directory. Then right-click the central panel and create a new answer-file. The graphical interface divides the answer-file into Components and Packages, of which the interesting section is Components for us. To add answers to the answer file, you need to choose components from the image by right-clicking them and add them to the answer file, where you can specify what it will respond. The components I am going to add to get a fully automated installation up to the login will be (there are two kinds of components, the ones introduced with amd64 and the ones with x86 - these determine the architecture and each component exists for both, so pick the one according to your architecture):
- amd64_Microsoft-Windows-International-Core-WinPE_neutral -->windowsPE
- amd64_Microsoft-Windows-Setup_neutral -->windowsPE
- amd64_Microsoft-Windows-Security-SPP_neutral -->generalize
- amd64_Microsoft-Windows-Deployment_neutral -->specialize
- amd64_Microsoft-Windows-Security-SPP-UX_neutral -->specialize
- amd64_Microsoft-Windows-Shell-Setup_neutral -->specialize
- amd64_Microsoft-Windows-Shell-Setup_neutral -->oobeSystem
If you click on one of the components or expand it, you will see the values it has on the right Properties panel, which is where you will enter yours as well. The first component is amd64_Microsoft-Windows-International-Core-WinPE_neutral, the interface-language and locale settings are stored here. On most DVDs, there is only one setting available (you can see which are by booting from your original DVD and trying to install from it - this can be easily reproduced in a virtual machine). If you speak English, then chances are good that you have en-US on your disk, so enter it into InputLocale, SystemLocale, UILanguage, UILanguageFallback and UserLocale. Also, expand the component and enter it into UILanguage of SetupUILanguage.
Afterwards, expand amd64_Microsoft-Windows-Setup_neutral under WindowsPE. Right-click DiskConfiguration and choose Add new disk. Set its values DiskID=0, WillWipeDisk=true and right-click the CreatePartitions component to choose Add new partition. This will be your primary partition, you can add more if you like, but I will keep only this one. I set its values to Extend=true, Order=1, Size=20000 and Type=Primary (extend means that this partition will take up all free space left). Next right-click ModifyPartitions and choose Add ModifyPartition - this will prepare your partition for install. Set its values to Active=true, Format=NTFS, Label=Choose_a_name_here, Letter=Choose_a_letter_here, Order=1 and PartitionID=1.
Afterwards right-click ImageInstall to AddDataImage - extend the OSImage, click InstallTo and set its values to DiskID=0 and PartitionID=1.
Next select the UserData, set the value of AcceptEula=true and enter your FullName and Organization.
If you are running a non-registered version of Windows 7 you might be interested in the amd64_Microsoft-Windows-Security-SPP_neutral component of generalize. Set the SkipRearm=1 to enable more rearms.
Afterwards extend amd64_Microsoft-Windows-Deployment_neutral and right-click RunSynchronous to Add RunSynchronousCommand. Set the new command's values to Order=1, Path=Net user administrator / active:yes, and WillReboot=Never.
Click amd64_Microsoft-Windows-Security-SPP-UX_neutral and set SkipAutoActivation=true.
Then click amd64_Microsoft-Windows-Shell-Setup_neutral and choose a ComputerName. Set CopyProfile=true and add the information you want. The TimeZone is necessary for automation, you can find the correct formatting on the Microsoft page (for Western Europe, it's W. Europe Standard Time).
Afterwards click amd64_Microsoft-Windows-Shell-Setup_neutral in oobeSystem and again enter the TimeZone. Then expand the component and select OOBE to change its values to HideEULAPage=true, NetworkLocation=Work(for example) and ProtectYourPC=1. Then right-click the LocalAccounts component and Add new LocalAccount. Change its values so that they fit your choice of account-name etc.
You should be done now and the changes you made should enable a completely automated installation. Now save the file into the root directory of your copied Installer DVD files as autounattend.xml. Make a bootable DVD-image out of the files again (use a burning software such as the free ImgBurn) and test it in a virtual machine.
